Connecting to a MySQL Database in C# Hosted in Bluehost
Developing projects in C# can be hard.
Developing projects in C# that need to connect to a database can be even harder.
The purpose of this post is to help to make that process a little easier.
I have created a step-by-step process for connecting a C# project to a MySQL Database that is hosted in Bluehost. While some of the below sections are specific to Bluehost, using a different host should be a fairly similar process once you have acquired your server address.
Creating Your Connection String
In order to create a connection to a MySQL Database via C#, a connection string is required.
Connection strings consist of four major parts:
- server: the IP Address of the database.
- user: the user name is used to connect to the database.
- password: the password associated with the user being used.
- database: the name of the database being connected to
server={DATABASE_ADDRESS};user={USER_NAME};password={USER_PASSWORD};database={DATABASE_NAME}
The database connection strings should exist within the appsettings.json file of the C# project.
 "ConnectionStrings": {
    "Default": "server=123.123.123.123;user=userName;password=awesomePassword;database=databaseName"
  }
Getting your Bluehost Server
When you are creating a new MySQL Database in Bluehost, you configure the database name as well as the users associated with the database.
What you are not getting without a little digging is the server name.
The server name, to be used within the connection string, is listed as “Shared IP Address” under “General Information” within the “Advanced” view of your Bluehost administration panel (highlighted in yellow in the below screenshot).

Allowing External Connections in Bluehost
By default, external connections to the Bluehost hosted MySQL database, will be blocked. To get around this, you need to allow remote MySQL Connections. This can be done by navigating to the “Remote MySQL” configuration panel within the “Advanced” view of your Bluehost administration panel.
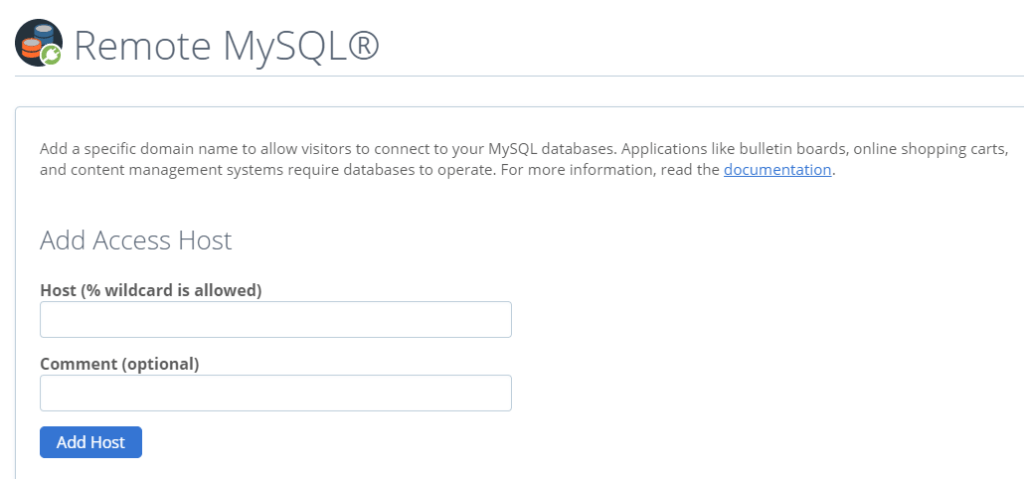
From the “Remote MySQL” view, enter in the IP Address of the machine your C# Project will be running on within the “Host” field. I also recommend you give the host a name within the “Comment” field so that you can update/delete the host in the future if necessary.
Installing Dependencies
The following dependencies are required in order to connect to a MySQL Database in C#:
- MySqlConnector
- MySql.Data
If you choose to use Entity Framework, the following dependencies are also required:
- MySql.Data.EntityFramework
- MySql.Data.EntityFrameworkCore
Configuring the Database Connection in C
Connections to the MySQL database should be made early on in the runtime of your C# application. If, for example, your application is a Web Application, the connection should be configured within the Startup class. Moving forward, my examples will be within this C# Web Application.
// This method gets called by the runtime. Use this method to add services to the container.
public void ConfigureServices(IServiceCollection services)
{
  services.AddTransient<MySqlConnection>(_ => new MySqlConnection(Configuration.GetConnectionString("Default")));
  services.AddDbContext<ApplicationDbContext>(options => options.UseMySQL(Configuration.GetConnectionString("Default")));
}
The above code initiates the connection to the MySQL Database, but it does not show how the data will be read from the database. This will be done with the ApplicationDbContext class along with some repository classes for data fetching.
Defining the ApplicationDbContext
The ApplicationDbContext essentially lets the C# application know the shape of the database.
public class ApplicationDbContext : DbContext
{
  public DbSet<AwesomeUser> AwesomeUsers { get; set; }

  public ApplicationDbContext(DbContextOptions<ApplicationDbContext> options) : base(options)
  {
  }

  protected override void OnModelCreating(ModelBuilder modelBuilder) {
    base.OnModelCreating(modelBuilder);

    modelBuilder.Entity<AwesomeUser>().ToTable("USERS");
    modelBuilder.Entity<AwesomeUser>().Property(nameof(AwesomeUser.Id)).HasColumnName("USER_ID");
    modelBuilder.Entity<AwesomeUser>().Property(nameof(AwesomeUser.LoginName)).HasColumnName("LOGIN_NAME");
    modelBuilder.Entity<AwesomeUser>().Property(nameof(AwesomeUser.FirstName)).HasColumnName("FIRST_NAME");
    modelBuilder.Entity<AwesomeUser>().Property(nameof(AwesomeUser.LastName)).HasColumnName("LAST_NAME");
  }
}
The above class defines the database context, which includes one table named USERS. In this case, the user id, login name, first name, and last name properties within the AwesomeUser class are being paired up with their associated database column within the USERS table.
Defining the Data Repository
It’s common practice to have a repository class that handles data manipulation operations on each data entity. Generally, by default the repository classes contain Create, Read, Update, and Delete (CRUD) operations, but may also contain more complicated manipulations if the application requires it.
The data repository will need to take the ApplicationDbContext class as a parameter within the constructor in order to have access to the database context. This is shown in the below code.
public class AwesomeUserRepository : IAwesomeUserRepository
{
  private readonly ApplicationDbContext dbContext;

  public AwesomeUserRepository(ApplicationDbContext context)
  {
    dbContext = context;
  }
}
Once the dbContext value is declared and set within the repository, data manipulation methods can be created.
Create Operation
In the database, each of the data classes (AwesomeUser) is represented by a single row in the database table. When a create operation is completed, the data object is added to the database along with any of its associated objects if there are any.
public bool CreateUser(AwesomeUser user)
{
  bool success = false;
  try
  {
    dbContext.AwesomeUsers.Add(user);
    dbContext.SaveChanges();
    success = true;
  }
  catch (Exception) { }
  return success;
}
Read Operation
Reading a value by id can be done by reading the IQueryable dbContext.AwesomeUsers property.
public AwesomeUser GetByUserId(long userId)
{
  return dbContext.AwesomeUsers
    .Where(u => u.UserId == userId)
    .SingleOrDefault();
}
Update Operation
Updating existing values can be done by updating the value and then saving the database changes. You are not required to be explicit in setting specific properties, but it is encouraged in order to make sure the user isn’t updating values they shouldn’t be.
public bool UpdateUser(long userId, AwesomeUser user)
{
  AwesomeUser existingUser = GetByUserId(userId);
  if (existingUser == null)
  {
    return false;
  }
  bool success = false;
  try
  {
    existingUser.LoginName = user.LoginName;
    existingUser.FirstName = user.FirstName;
    existingUser.LastName = user.LastName;
    dbContext.SaveChanges();
    success = true;
  }
  catch (Exception) { }
  return success;
}
Delete Operation
Deleting values can be done by calling the Remove method in the database context.
public bool DeleteUser(long userId)
{
  AwesomeUser existingUser = GetByUserId(userId);
  if (existingUser == null)
  {
    return false;
  }
  bool success = false;
  try
  {
    dbContext.AwesomeUsers.Remove(existingUser);
    dbContext.SaveChanges();
    success = true;
  }
  catch (Exception) { }
  return success;
}